Artists, to your palettes!#
Node-RED is a visual programming tool, based on Nodejs, for interconnecting objects in a playful way - the Internet of Things!
The editor is a WEB browser, enabling the creation of flows by linking nodes.
The strength of Node-RED lies in the palette of node sets made available by a rich community of contributors.
If you haven’t already done so, install Node-RED as shown on this page. post
The editor#
The Node-RED editor is made up of several activity zones:
- Menu
- Notification
- Nodes
- Stream creation
- Recording / Stream activation
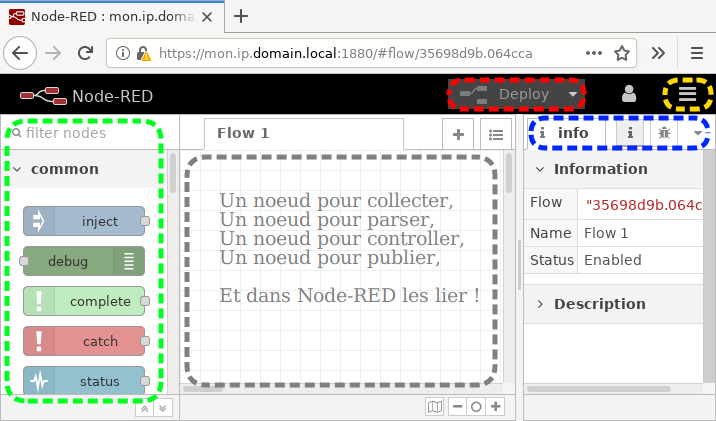
Menu#
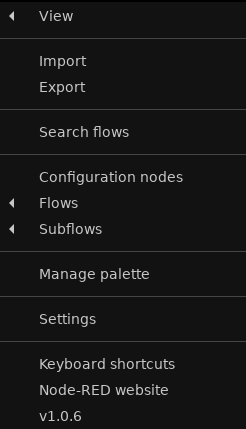
The menu allows you to:
- Import / Export nodes & streams in JSON format
- Manage streams and sub-streams
- Manage node set palette
- Configure keyboard shortcuts, interface, palette…
Nodes#
Nodes are divided by type:
- Common: input / output
- Function: manipulate, process, modify…
- Network: http, mqtt, tcp, udp, websocket…
- Sequence
- Parser: convert, extract from or to various formats (csv, html, json, yaml, xml)
- Storage: store / read
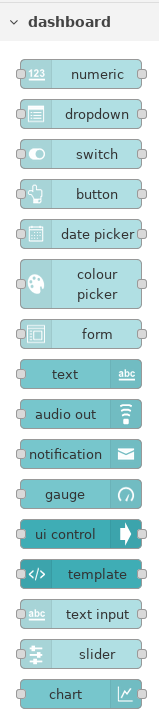
Other node sets can be added: database storage, dashboard / ui, mail, sms, Shelly devices, Philips HUE devices, twitter, RSS, watson…
These must be installed via the palette.
Notification#
A very important area, where:
- Information provides a description of the selected node
- Debug displays the contents of the injected node
- Adding the dashboard will provide access to the UI
Flux#
To create a flow, simply drag and drop a node, a second node, fill in the expected information and link them.
Deploy#
Once the feed has been created, this button activates and saves the feed configuration.
Palette#
Node set management is performed via the palette. Let’s install Node-RED’s dashboard node set.
Installing the dashboard#
Go to the menu and click on Manage Palette.
An interface opens, via the install tab, search for the desired “Node”. Here node-red-dashboard.
| Install | Set of Nodes |
|---|---|

|
|
- Go to the node’s web page
- Install the chosen node
Installing the node set will provide the new “Dashboard” type and associated nodes. A new icon will appear in the Notification area.
JSON Format#
JSON (JavaScript Object Notation) is a data exchange format based on a collection of {name:value} tuples.
Simple, it is easily understood by humans. The ideal format for exchanging and processing data passing through Node-RED nodes.
The JSON format used by Node-RED will enable us to manipulate msg objects.
Example:
| Name | Value |
|---|---|
| msg_id | 12345 |
Expression JSON:
{
    "_msgid": "12345",
    "payload": "myMessage",
    "topic": "myTopic"
}
Here, we’ll pass the tuple { “msg.payload”: “myMessage” } from the msg object to a different topic.
The function nodes will be used to manipulate the data contained in the JSON objects.
First flow - Hello World !#
Objectives#
Send the string “Hello World!” to the “Debug” notification area.
JSON expression:
{
    "_msgid": "e1a1d9f.71fb828",
    "topic": "",
    "payload": "Hello World !"
}
Flow#

- Drag and drop the “inject” node
- Open node properties (double-click on node)
- Modify payload type attribute to string
- Insert the “Hello World!” value in the payload
- Click on Done
- Click on Deploy.
- Open node properties (double-click on node)
- Click on injection and observe the result below:
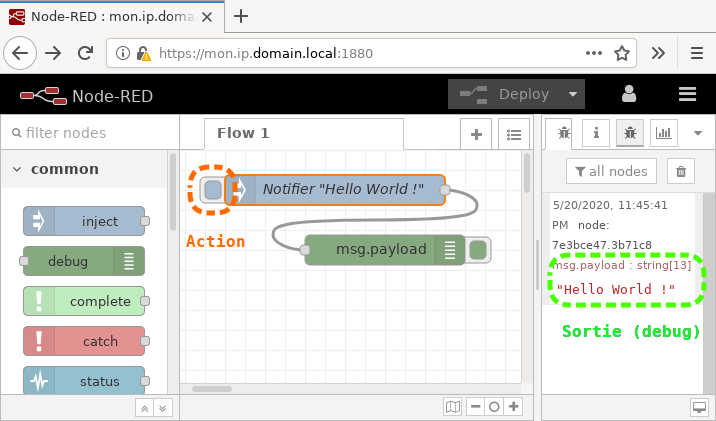
Import JSON code:
[
  {
    "id":"35698d9b.064cca",
    "type":"tab",
    "label":"Flow 1",
    "disabled":false,
    "info":""
  },
  {
    "id":"4d95dfd.a7f10a",
    "type":"inject",
    "z":"35698d9b.064cca",
    "name":"Send Sring",
    "topic":"",
    "payload":"Hello World !",
    "payloadType":"str",
    "repeat":"",
    "crontab":"",
    "once":false,
    "onceDelay":0.1,
    "x":290,
    "y":40,
    "wires":[["7e3bce47.3b71c8"]]
  },
  {
    "id":"7e3bce47.3b71c8",
    "type":"debug",
    "z":"35698d9b.064cca",
    "name":"Flow_1",
    "active":true,
    "tosidebar":true,
    "console":false,
    "tostatus":false,
    "complete":"false",
    "x":340,
    "y":100,
    "wires":[]
  }
]
Here are the three objects we use.
- tab: Flow 1
- inject: Send String
- debug: Flow_1
Second Flow - Hello Node-RED UI !#
Objective:#
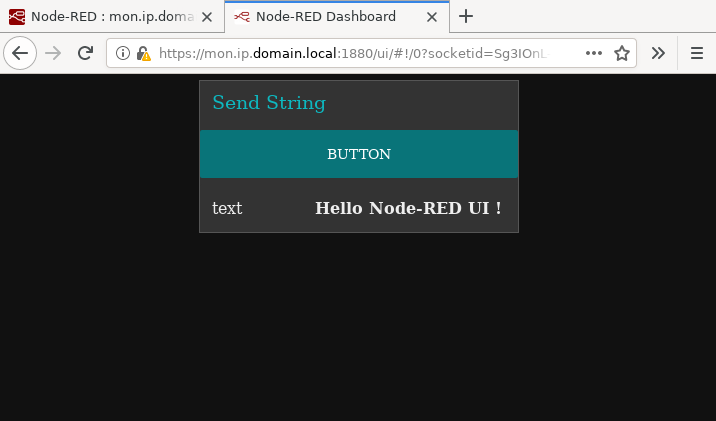
- An inject button sends the string “Hello Node-RED UI!” to a text node.
- The text node displays the received string.
- A debug node lets you see what’s transiting in the stream.
JSON expression transiting between nodes:
{
  "payload": "Hello Node-RED UI !",
  "event": "object",
    "clientX": 672,
    "clientY": 72,
  "bbox": "array[4]",
    "0": 562,
    "1": 104,
    "2": 880,
    "3": 56,
  "socketid": "CV3JvlrDJDNldwNpAAAI",
  "_msgid": "bda45c0c.9d2d9"
}
Flow#
The dashboard can be configured and customized.
- Layout: Component layout
- Site: Dashboard configuration (format, title & headers)
- Theme: Police, background…
- Layout design!
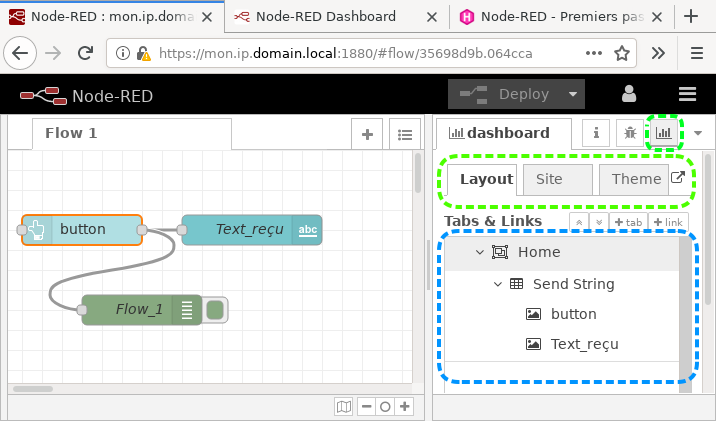
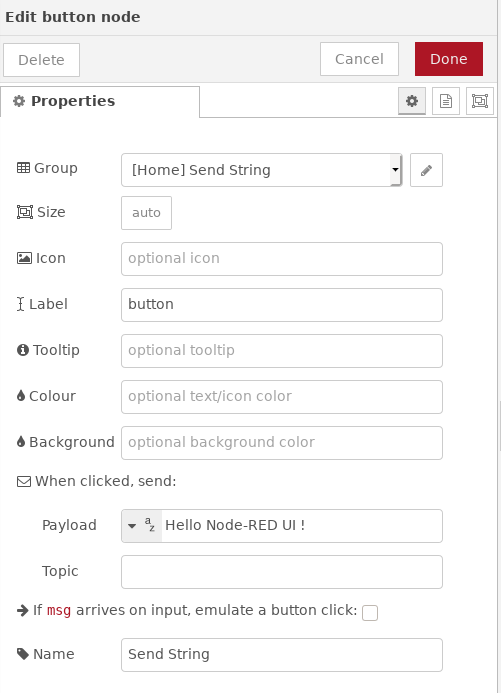
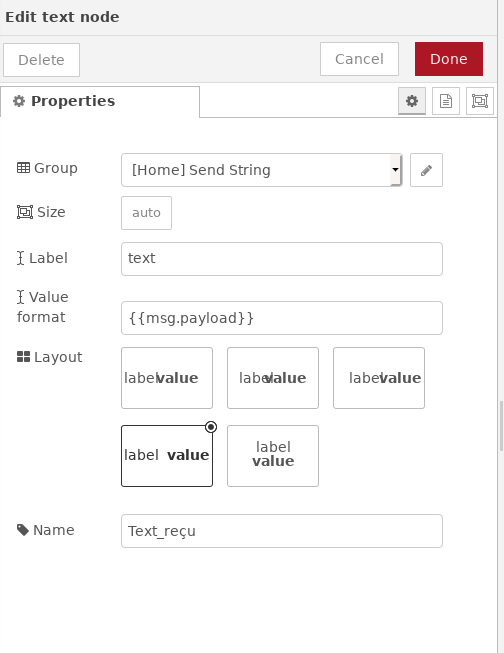
Configuration:
| Node Inject | Node Text |
|---|---|
|
|
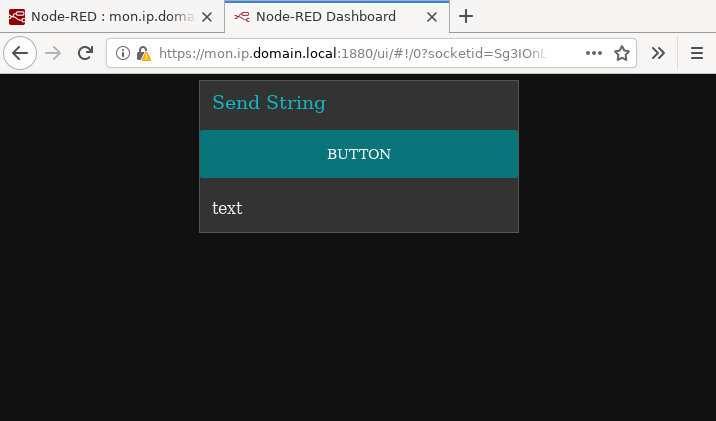
Result:
| Dash | Output |
|---|---|
|
|
Import JSON code:
[
  {
    "id":"35698d9b.064cca",
    "type":"tab",
    "label":"Flow 1",
    "disabled":false,
    "info":""
  },
  {
    "id":"7d96a6a4.181098",
    "type":"ui_button",
    "z":"35698d9b.064cca",
    "name":"send String",
    "group":"c169ab23.54c6f",
    "order":1,
    "width":0,
    "height":0,
    "passthru":false,
    "label":"button",
    "tooltip":"",
    "color":"",
    "bgcolor":"",
    "icon":"",
    "payload":"Hello Node-RED UI !",
    "payloadType":"str",
    "topic":"","x":110,
    "y":60,
    "wires":[["70becc11.b76f34","63a5dcff.d25e24"]]
  },
  {
    "id":"70becc11.b76f34",
    "type":"ui_text",
    "z":"35698d9b.064cca",
    "group":"c169ab23.54c6f",
    "order":2,
    "width":0,
    "height":0,
    "name":"Text_reçu",
    "label":"text",
    "format":"{{msg.payload}}",
    "layout":"row-spread",
    "x":290,
    "y":40,
    "wires":[]
  },
  {
    "id":"63a5dcff.d25e24",
    "type":"debug",
    "z":"35698d9b.064cca",
    "name":"Flow_1",
    "active":true,
    "tosidebar":true,
    "console":false,
    "tostatus":false,
    "complete":"payload",
    "targetType":"msg",
    "x":160,
    "y":120,
    "wires":[]
  },
  {
    "id":"c169ab23.54c6f",
    "type":"ui_group",
    "z":"",
    "name":"Send String",
    "tab":"67a6e042.8c9",
    "order":1,
    "disp":true,
    "width":"6",
    "collapse":false
  },
  {
    "id":"67a6e042.8c9",
    "type":"ui_tab",
    "z":"",
    "name":"Home",
    "icon":"dashboard",
    "disabled":false,
    "hidden":false
  }
]
Our six used objects are shown above.
- tab: Flow 1
- ui_button: Send String
- ui_text: text
- debug: Flow_1
- ui_group: Send String
- ui_tab: Home
Conclusion#
We were able to understand:
- Managing a flow via two nodes
- The JSON modeling and exchange format
- Installing a set of nodes via the palette
- Implementation of an interactive interface, via the dashboard
- The debug output